  |
MPLab and Hi-Tech C Tutorial
Last Updated 1 July 2002.
The following
tutorial covers PIC micros, MPLab and Hi-Tech C.
- how to install MPLab
- how to install Hi-Tech C
- how to set up a project for Hi-Tech C under MPLab. Note: Other methods do not support libraries, additional C files, or incremental compiles.
- how to use the simulator
- how to use the MPLAB-ICD emulator
Getting to know the MPLab and Hi-Tech C environment
Installing MPLab
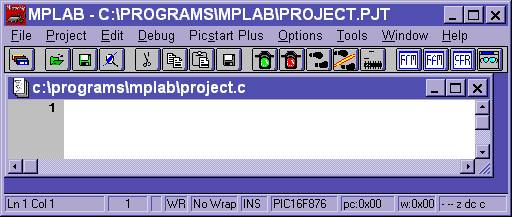
First off, you will need the
development program for PIC micros, MPLab. The latest version of MPLab at
the time of writing is 5.70. If you go to the Microchip web site http://www.microchip.com/ you will find the
latest version of this software. A screenshot of the Integrated
Development Environment (IDE) is shown below.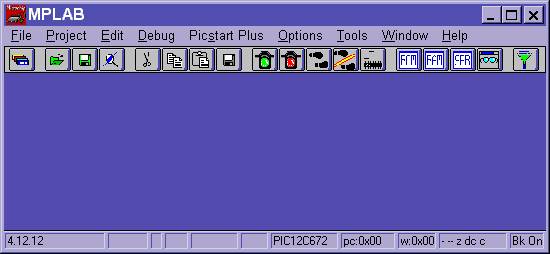
MPLab comes with it's own assembler. However, with the power of microprocessors these days, a C compiler is the preferred choice. Programming in C is not only easier and more powerful, code is also portable to other microprocessors such as Atmel, TI, or Zylog. In this tutorial will be using the officially supported Microchip C compiler, Hi-Tech C. This is available from http://www.htsoft.com/. The latest version at the time of writing is 7.86pl3. It is recommended that earlier versions are not used. In my two years of experience with Hi-Tech C, I have found it to be an excellent product. There has never been any case where the compiler has been at fault - I believe that the latest version is bug free.
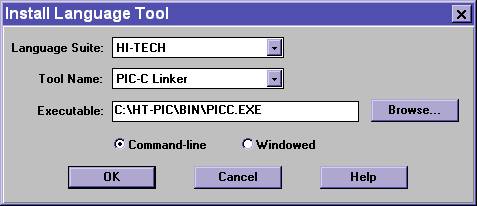
Telling MPLab where to find the Hi-Tech C compiler
1. After
you have installed Hi-Tech C, you have to tell MPLab where to find the C
compiler.
2. In
MPLab, select menu Project then Install Language Tool. You should see
the dialogue box as shown below.
3. Change
the language suite to Hi-Tech, and the tool name to PIC-C compiler, as
below.
4. Browse
to the Hi-Tech C directory C:\HT-PIC\BIN\ and find the executable
PICC.EXE as shown in the screenshot below.
5. Change
the tool name to PIC-C linker and repeat the process, as shown in the
screenshot below..
Note: Both Linker and Compiler must be specified. Both Linker
and Compiler point to PICC.EXE.
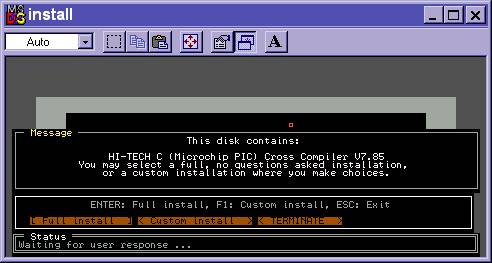
Trial Version: for the trial
version of Hi-Tech C, point both the Linker and Compiler to
PICL.EXE
Creating your first
project for Hi-Tech C
This particular tutorial is for the 12X, 16X and 17X version of Hi-Tech C
(piccdemo.exe or the retail version). It does not support the 18X version
of Hi-Tech C (picc18demo.exe or the retail verison). There is a FAQ on http://www.htsoft.com/showing how to integrate
the 18X compiler with MPLab.
Note: It is recommended that
this method is used. Its not important at the moment, as the tutorial will teach
the correct method, but selecting 'PIC C Compiler under 'node properties' for
'project[.hex]' makes it impossible to have multiple files, object files or
libraries.
If you follow these steps exactly, you will get a working
project.
1. From
the MPLab IDE, select the menu option Project then New Project. Go into
Explorer, and create a directory for your project on the hard drive. Back in
MPLab, browse to this directory.
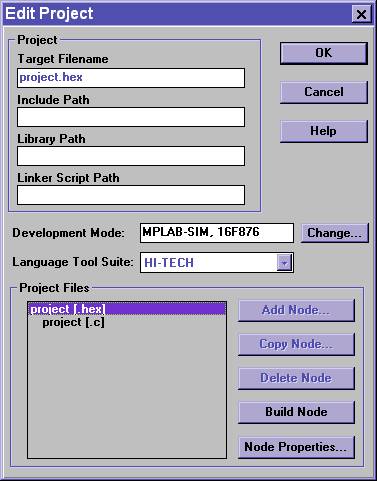
2. In
MPLab, type in the project file name, project.pjt then click Ok. This brings
up the edit project window as shown below.
3. Select
development mode to be MPLab-SIM, 16F877 as below. Ignore the warning that 'No
hex file has been built for this project'.
4. Select
language tool suite to be Hi-Tech as below. Ignore the warning that 'You will
lose all command line options'.
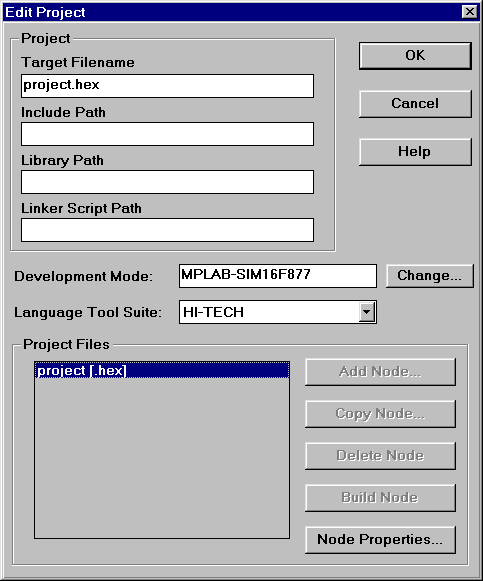
5. Click
on project [.hex] then node properties as above.
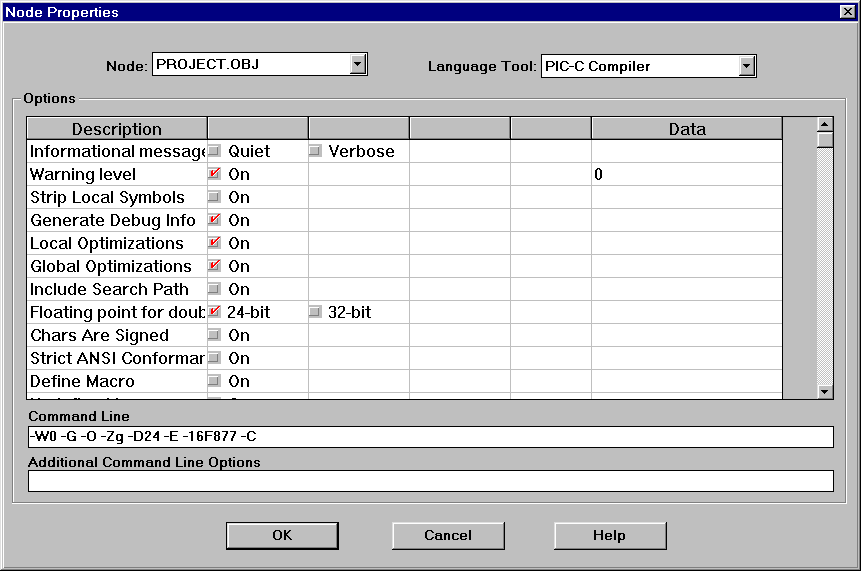
6. You
will see a window. Change 'Language Tool' to PIC C Linker, then match the
options to the screen shot below.
7. Note
the 'Compile for MPLAB-ICD' option switch below. This reserves 256 program
words at the top of memory and various ram bytes, to make the .hex file
compatible with the MPLAB-ICD emulator. The 'Compile for MPLAB-ICD' option is
not needed with the ICEPIC 2000 emulator.
8. Note
the -fakelocal switch in additional command line options' below. This
allows one to view local variables inside a function.

9. Click
OK, twice, to the back into the MPLab IDE. Click File then New File.
Save it as project.c, in your own directory, as shown below. Now there should
be two files in this directory - project.pjt and project.c.
10. Go back into the "edit
project" dialogue by selecting menu Project then Edit
Project.
11. Click on add node then add
project.c as shown below:
12. Click on project[.c]
then "node properties". Change the options to match the picture below. All
other options are unchanged from the defaults.
13. Click Ok, twice, to go back
into editing the project.c file.
14. Well, we are almost
there. Type a short skeleton program to satisfy the compiler:
#include
<pic.h>
main()
{
}
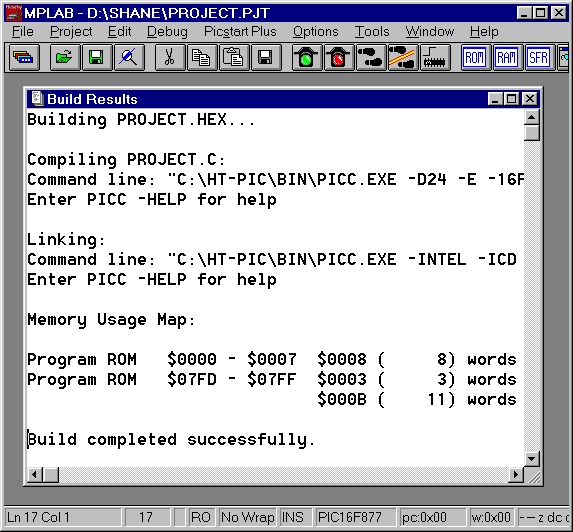
15. Select menu Project and
'Make Project (F10) to compile everything. You should see the results
displayed, as in the screenshot below.
16. If you have any errors at
all, such as 'MPLab
cannot find .hex file' or 'Build tool not installed properly', check that the
language tools are installed properly. See here.
17.
Later on, if you have more files, libraries or object files, you can add them to
the project by clicking on 'add node'. These files will be compiled
individually, then linked at the end.
18. If you want incremental compiles,
add the line 'c:\ht-pic\include' under 'include path' in the 'edit project' dialogue.
19. Finished. The sample project
created with these instructions is available for download.
20.
If you didnt get a working project, follow through it again, copying the
instructions exactly, paying particular care to the screenshots. If you still
cant get it working email mailto:info@microchipc.com?subject=Project
setup issues.
Using Hi-Tech C
trial version
The steps described above work for the full version of
Hi-Tech C. However, the trial version only supports the PIC16C84 and
PIC16F84, not the PIC16F876 as used in this tutorial. Under 'Options ..
Development Mode .. Processor' change the processor to PIC16F84.
This fixes the error: MPLAB is unable to find output file
"PROJECT.OBJ"
Using the simulator to test code
MPLab has a built in microprocessor simulator. If you compile C or assembly code you can test its operation by simulating what it does. Select menu options then development mode. Set the development mode to MPLAB-SIM simulator See menu Debug and Run for running, stopping, single stepping, and reset commands. Set breakpoints by right clicking on a line of C, and selecting breakpoint. The stopwatch under window and stopwatch is useful for timing how long code takes to run set breakpoints before and after then run it.
Using an In Circuit Debugger (ICD)
Normally, when you construct a device using a microprocessor, you plug the microprocessor into the socket on the PCB and it works. An In Circuit Debugger (ICD) plugs into the socket instead of the microprocessor, under the control of a computer.
The advantage of an emulator over a stand-alone microprocessor is that you can see what's going on inside the chip. You can single step through lines of code, set breakpoints, view variables, and time how long sections of code take to execute. Its operation is exactly the same as using the simulator.
The difference between an emulator and a simulator is that a simulator is just a program running on the computer. An emulator plugs into the target circuit, and can interact with the real world such as memory chips, button presses, and variable voltages.
In this tutorial, we will be using the MPLAB-ICD emulator. Read through the documentation for the MPLAB-ICD emulator, to get a basic idea of how it works. This is available in the MPLab IDE, under Help then MPLAB-ICD help
Next, set up the emulator.
1.
Connect the emulator to COM1 of the computer with a serial cable.
2. The
emulator probe is like any microprocessor -- its needs power, the reset pin
pulled high, and a clock.
3. Plug
the 28-pin or 40-pin emulator probe into the development board, making sure that
it is plugged in the correct way around.
4. Give
the development board power by connecting in the 9V plug pack. The red LED
should be flashing on the emulator probe, indicating that is ready to the
reset.
5. Start
up MPLab. Load up the project, as before. Select the menu option
Options then Development Mode. Select the options to match the
dialogue box, as shown below.
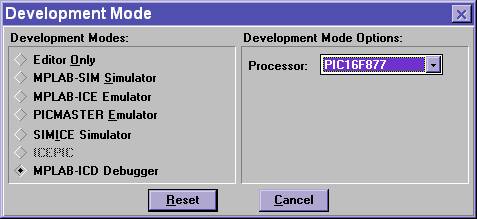
6. Click Reset and if the emulator is connected properly to the computer, you should see the diaglogue box as shown below. Change the options so that it matches the control box below.
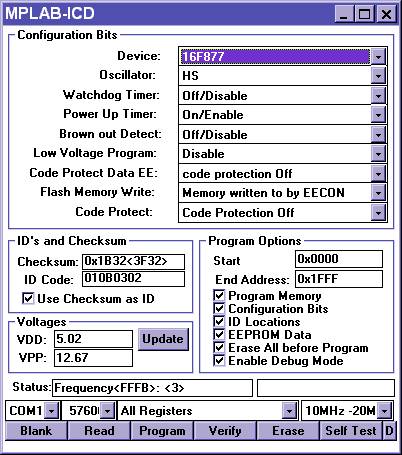
7. These
settings are the default for almost every situation, with the exception of the
oscillator. When
using an external crystal with speeds of higher than 8Mhz use the settings as
shown above. Crystal speeds of lower than 8MHz use XT for the oscillator setting
instead HS. When
using a RC oscillator for the clock, made up of a resistor and a capacitor, use
RC for the oscillator setting instead of HS.
8. Next,
to test if the emulator is working, type in the sample program shown below or download the project then
unzip it into c:\pic\:
//sample program
for MPLAB-ICD development board
//set oscillator to RC for 2Mhz, then check
to see if all red LEDs flash @ 2Hz
#include
<pic.h>
main()
{
unsigned int
i;
TRISC=0b00000000;
//set ports of port C to output -
o=output, 1=input
while(1)
//loop forever
{
PORTC=0xFF;
//turn leds on, 0xFF = 0b11111111
for(i=0;i<28000;i++) {};
//delay, its 9 clock ticks per i++, @2Mhz gives
~500ms
PORTC=0x00;
//turn leds off, 0x00 = 0b00000000
for(i=0;i<28000;i++) {};
//delay, its 9 clock ticks per i++, @2Mhz gives
~500ms
}
}
9.
Compile the program by selecting menu option Project then Make
Project. Or you can press F10.
10. Download the program into the
flash chip of the emulator by clicking Program in the white MPLAB-ICD control
box as shown above.
11. When it is
finished, run the program by selecting menu option Debug then Run then
Run. Or you can press F9.
12. You should see the 8 red
lights on the development board flashing at 1Hz.
13. Finish.
We welcome any suggesions or
comments! Send them to Shane Tolmie on mailto:info@designrem.com.
This site is a completely
separate site to www.microchip.com, and is maintained independently of Microchip
Ltd., manufacturers of the PIC micro.
All code on this site is free for
non-commercial use. Commercial use normally free, however, it is prohibited
without contacting DesignREM Ltd. for
permission.
All content on this site created by Shane Tolmie is copyrighted
by Shane Tolmie 2000, 2001, 2002,
2003.